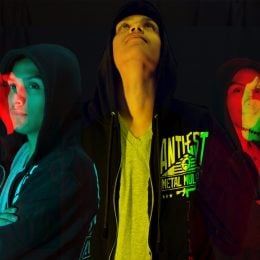
Double Colors Exposure
You will be creating a Double Color Exposure using Photoshop and Portraits to create a color fringing look. You will be taking portraits of your partner in two (or three) different angles. You will need to fill the frame and make sure you shoot from the waist up. It is your decision on the orientation of the images. Although, you will need to make sure that the two images you choose to use are orientated the same way. For example, both should be either horizontal or vertical.
You need 6 different poses: 3- side view and 3-front view. This will allow you to try various color combinations. You must shoot your images on a blank, clean background. The studio works best, but if you can find a nice solid background outside that will work just fine.
- Bring both images into Photoshop, open a new document and and place both images in, onto two separate layers.Then on the top layer click the fx tool [layer styles]button at the bottom of the Layers Palette.
- Uncheck the R G B boxes in the advanced blending station. As you click the boxes one-by-one you will see your image change colors. Once you get the color combination you like hit OK.
- Then if there is left over space after adjusting where you want the images to be, select a slice of the image with the correct color [make sure it is just the background and does not contain any of the subject inside] using the Marquee Tool.
- Then click CTRL + T and it will turn your selection into the bounding boxes to transform it. Pull from the side to stretch it out.
- Then add and adjustment layer [selective color] to refine the color combinations you chose.
Double Color Exposure Video
Watch this Video in order to get a better understanding of how double color exposure works.
Watch this Video in order to get a better understanding of how double color exposure works.


No comments:
Post a Comment